Your account needs active Technician access to the organization. Use the email your organization invited. If you created a new organization through checkout, your owner account already includes Technician and Android user access; no separate invitations are needed for that account. The Tech Workspace works in modern browsers on Windows, Mac, Linux, Android, and iOS. Use your computer, tablet, Android phone, or iPhone; the person receiving support needs the Screen2Screen Android app.
Supporting someone while mobile? Open the Tech Workspace in your own phone’s browser. Sign in, check the queue or invite a Ready device, and join after the Android user approves sharing. You can view their screen and device details, point to a step, or use enabled Touch control while you are away from your desk.
Updated November 9, 2026. The screenshots below use fictional names and email addresses. Select a screenshot to open it at full size. Screenshots may show an earlier toolbar or tab arrangement; follow the current controls described in this guide. Screen details vary with your organization, app version, and device permissions.
Use your Technician account
If your organization was just created through checkout, open the Tech Workspace with your owner account. For an invited technician, follow these steps:
- Open the Admin Workspace. Pending Technician invitations are accepted there.
- Choose the Google account matching your invitation, or sign in with your Screen2Screen email and password.
- If you are creating an email/password account, use your invited address and verify it through the email Screen2Screen sends. Then sign in again.
- Accept the Technician invitation for the correct organization, then open the Tech Workspace with the same account.
- If an authenticator is enrolled, enter its current six-digit code when prompted. If your organization requires MFA, complete authenticator setup before continuing.
After a Technician invitation is accepted in the Admin Workspace, a technician-only account is directed to the Tech Workspace. Organization administration still requires Owner or Administrator access.
Your organization admin can set a display name for your membership. That name identifies you in future support connections and device invitations; it does not change your sign-in email.
Read the Requests queue
Select your organization from the menu at the top. The Requests tab shows user-initiated support requests first, followed by the organization’s Always On devices. The web tabs wrap on small screens; the Device Info sections remain collapsible on phones and tablets.
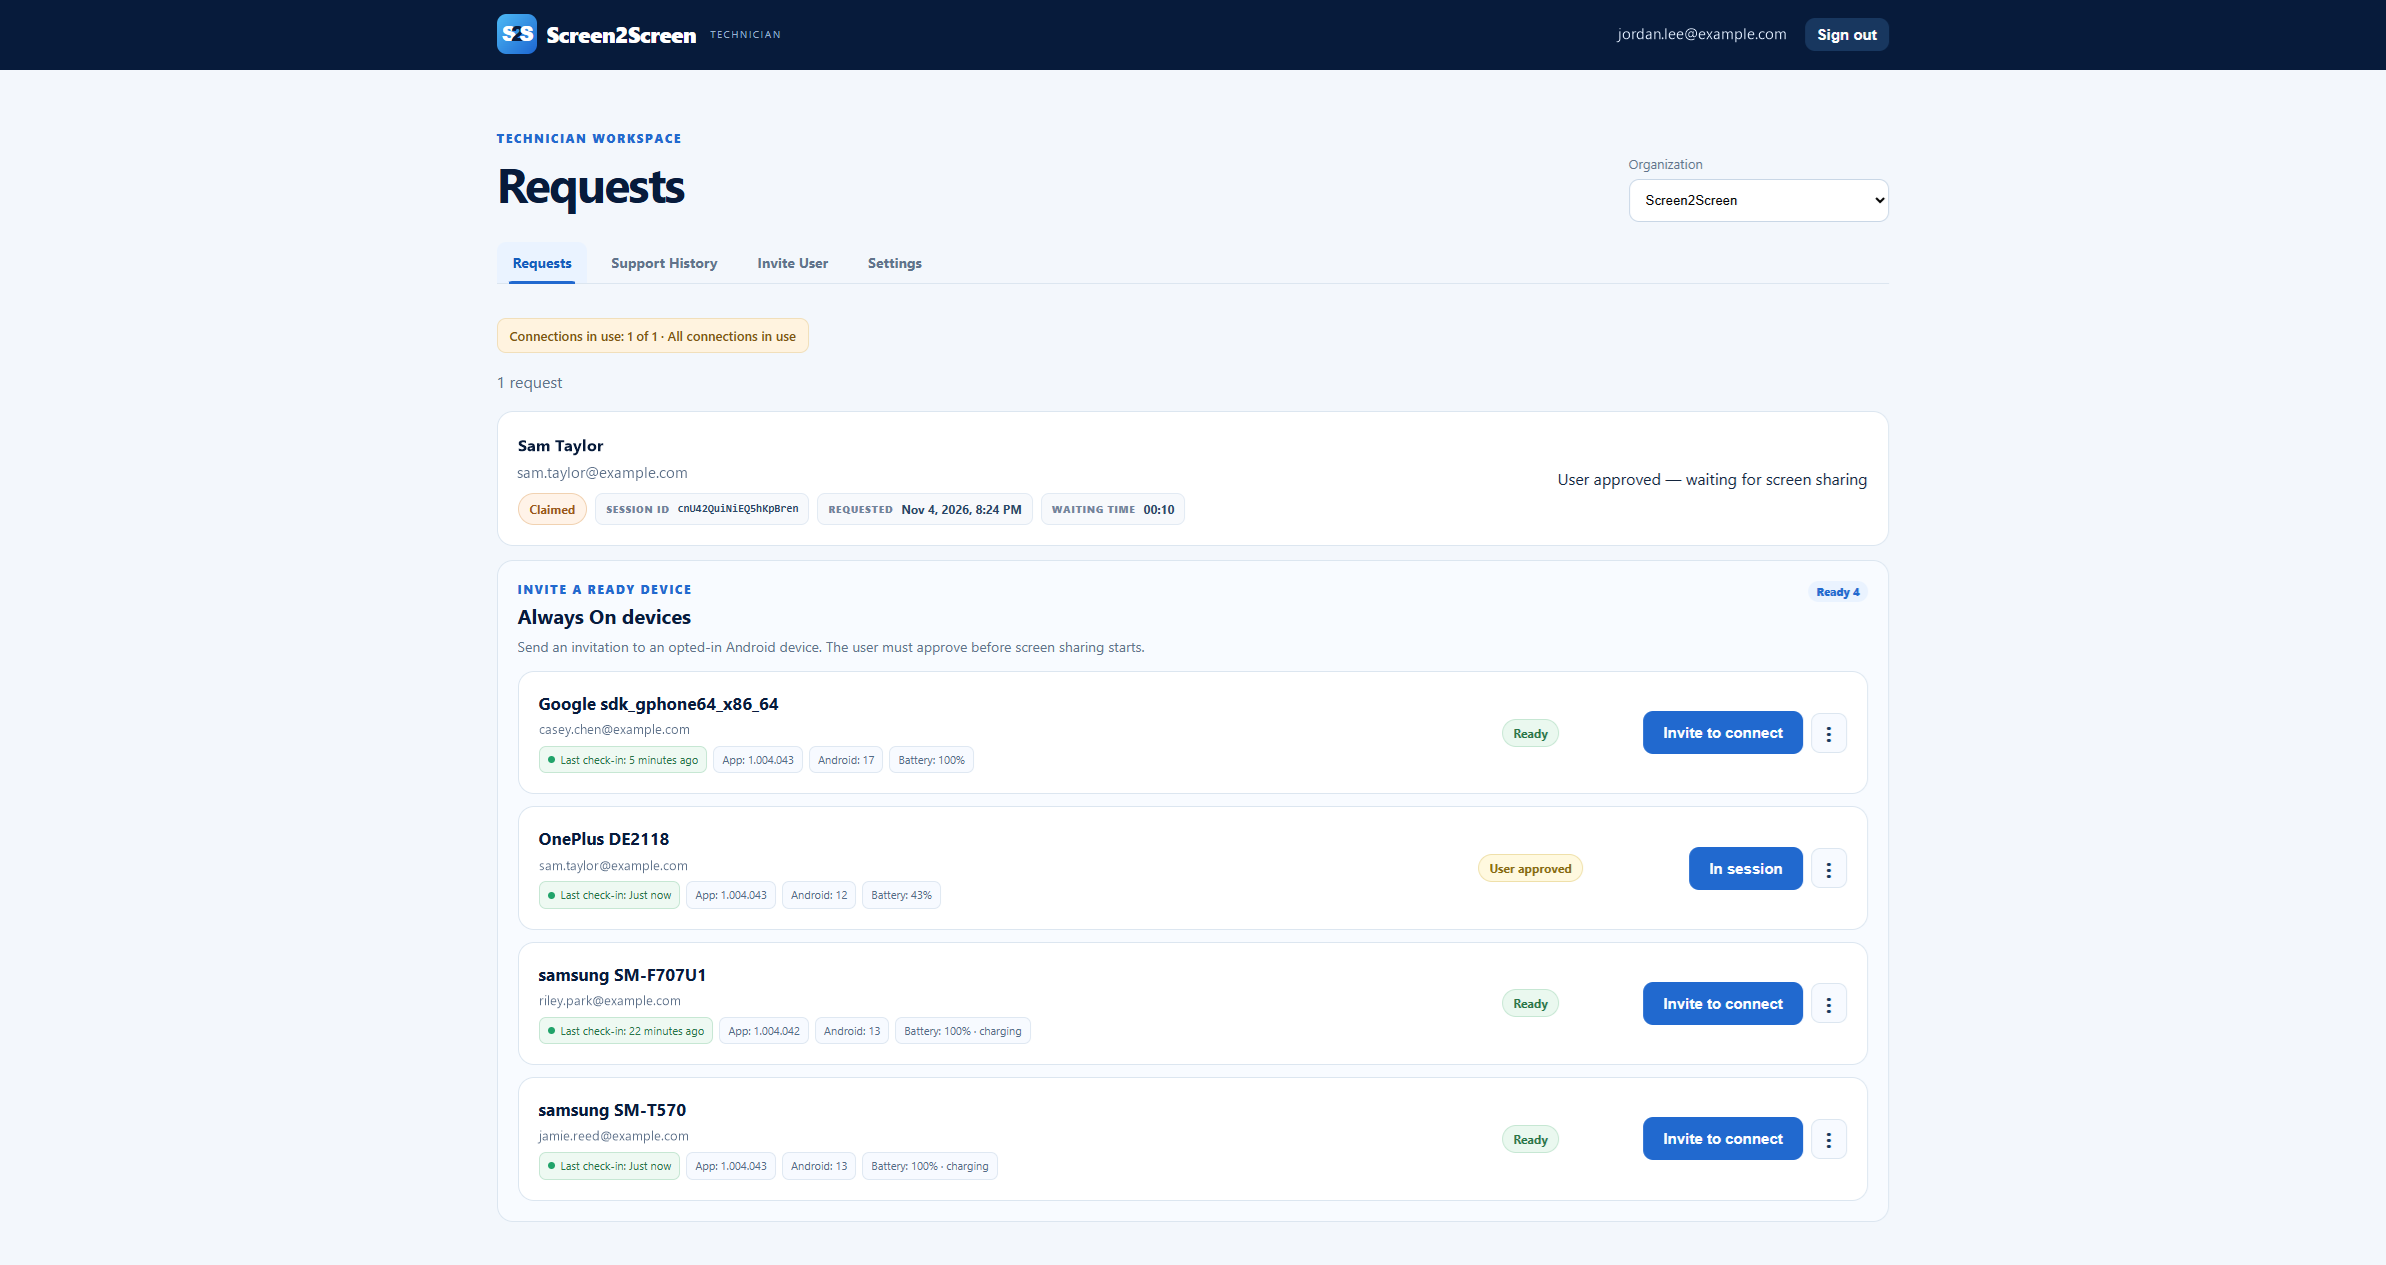
Open full-size screenshot ↗
- ✓Identify the person and session.
Check the name, email, Session ID, requested timestamp, and running waiting time. Use the Session ID when referring to a particular support interaction.
- ✓Follow the status pill.
Requested means the user is waiting. Claimed means a technician has taken the request. Connecting and active states show progress toward a live session. The example above shows a claimed request while screen sharing is being prepared.
- ✓Check connection capacity.
The connections-in-use indicator shows the organization’s shared simultaneous-session allowance. Starting, active, and reconnecting sessions use capacity; waiting requests, Ready devices, and unanswered invitations do not. Ask an admin if more capacity is needed.
- Choose Accept request for the user you are supporting.
- Introduce yourself and confirm that the person expects support.
- Wait for the user to approve the connection and Android’s screen-sharing prompt. A queue entry alone does not share their screen.
Start from Always On devices
Always On lets an opted-in Android device appear in the Ready list so a technician can invite it into a session. It does not start screen capture in the background: the user still accepts the invitation and approves Android screen sharing.
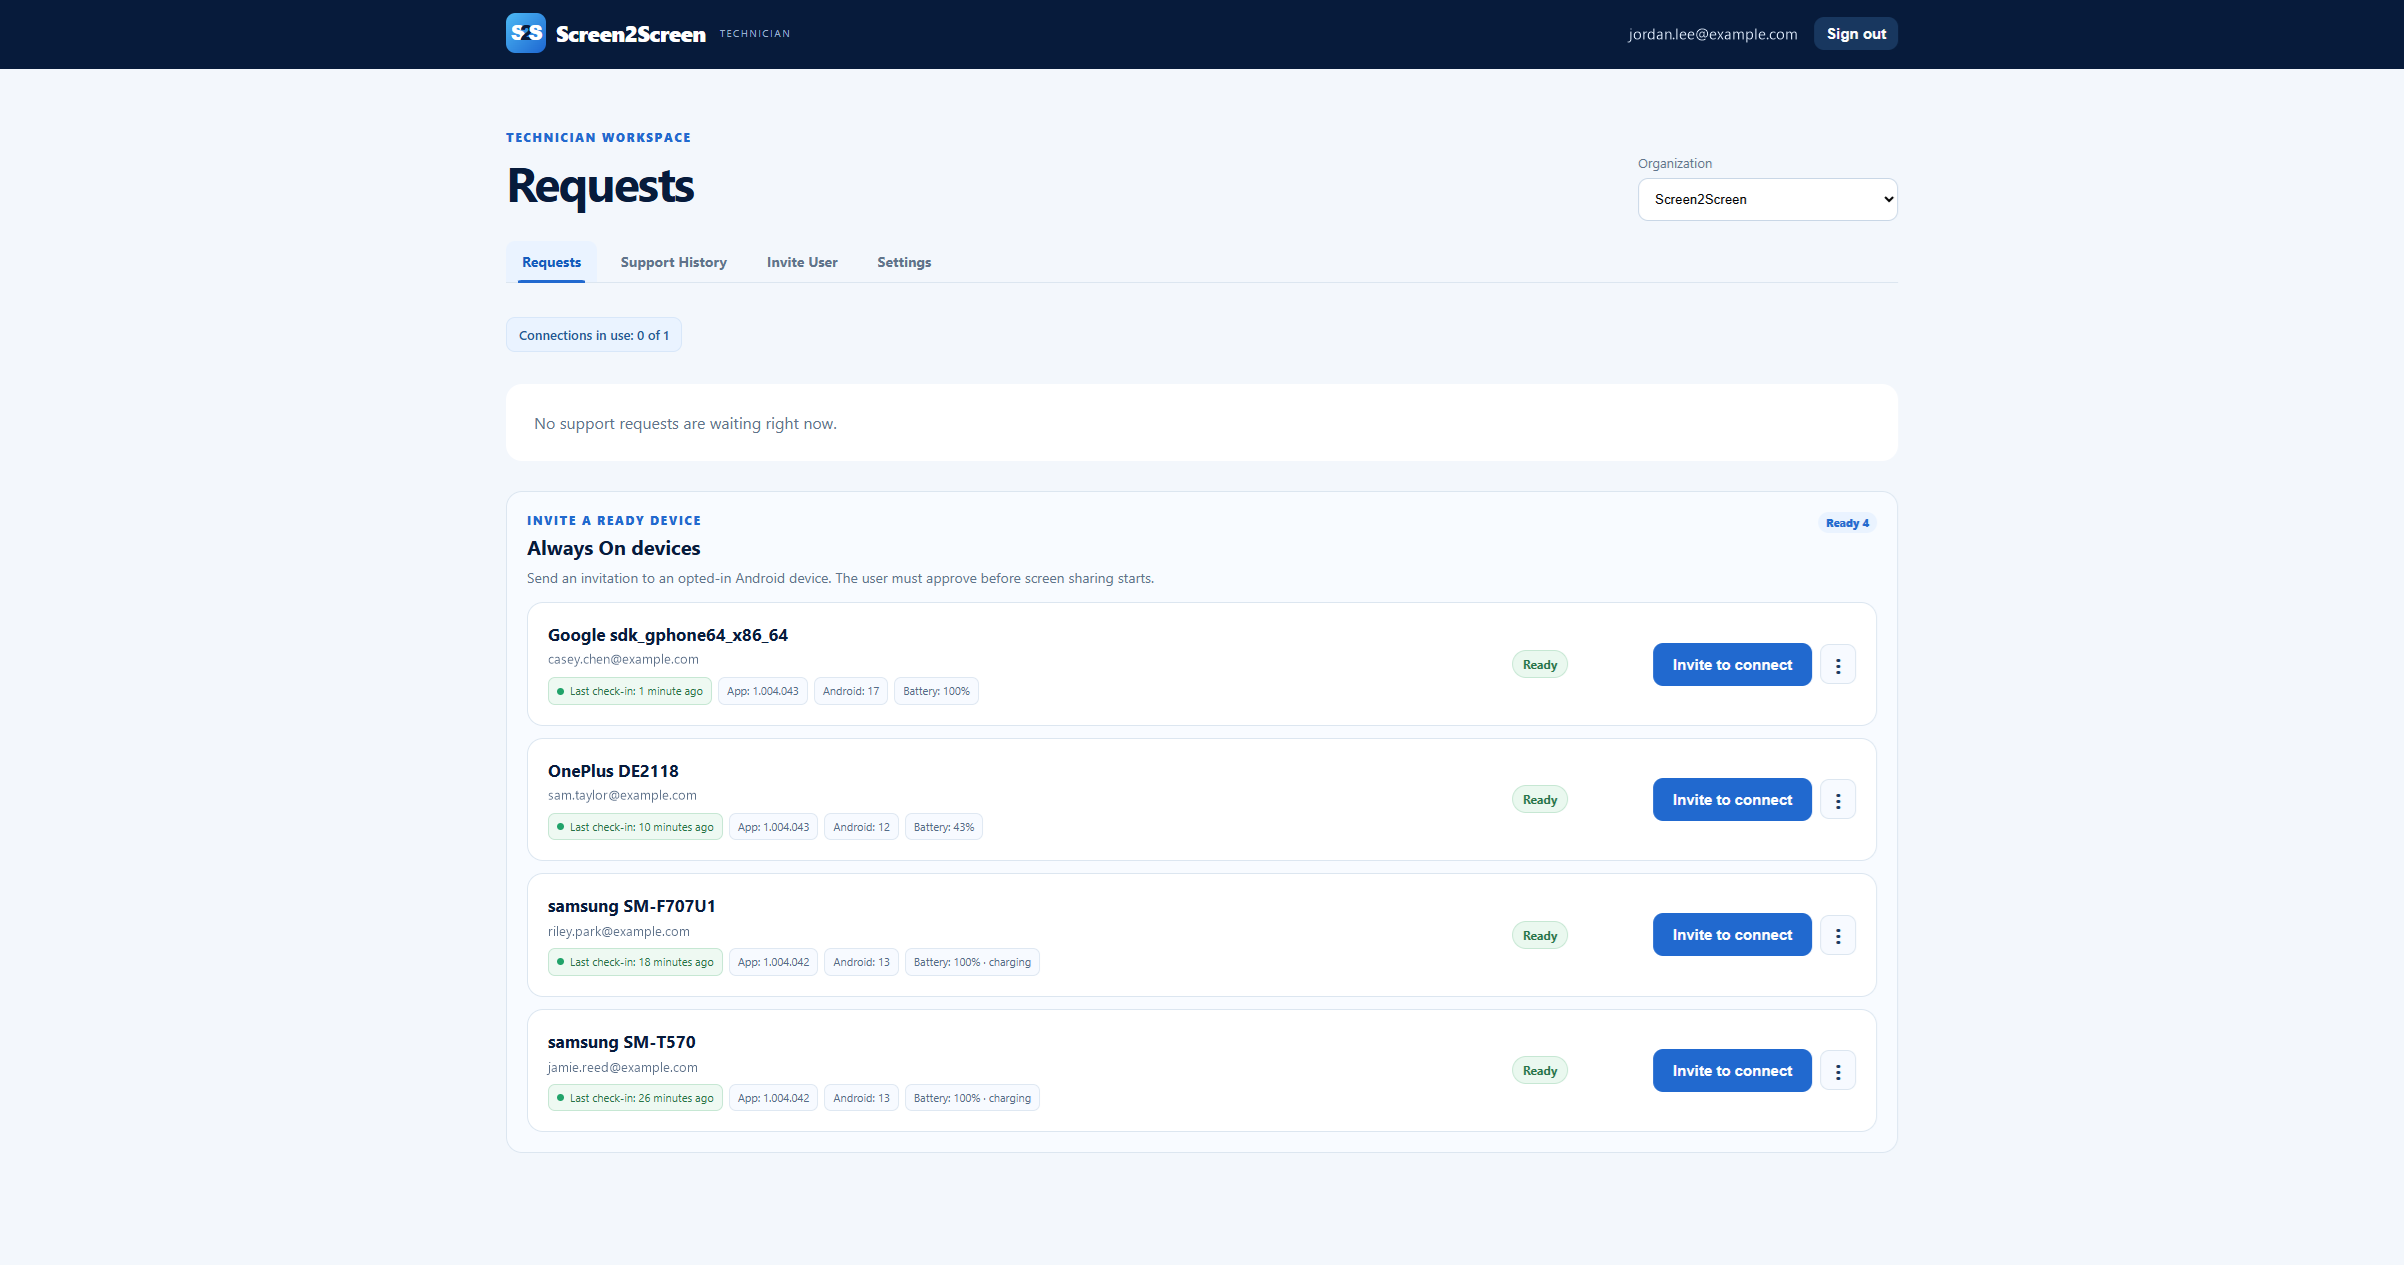
Open full-size screenshot ↗
Use Search to find a device or email, sort by Device name or Email address, and select 10, 25, or 50 devices per page. Search and sorting apply before paging. A stale check-in is not proof the device is online; invitation receipt is separate from user approval.
What the device row tells you
Each row identifies the device and account, plus its last reported Screen2Screen version, Android version, battery level, and last check-in. A green freshness indicator means a recent check-in; an older check-in is marked differently. Hover over the check-in to see its exact time.
- Select Invite to connect on the correct device.
- Invitation sent means the invitation has been created. Received by device confirms the app has received it; it is still waiting for the user’s approval.
- After approval, the row can show User approved and then Session active. Wait for the shared screen before beginning device interaction.
- If support is no longer needed, choose Cancel Invite while the invitation is pending. This also clears the related invitation notification on the device.
For a stale or duplicate registration, open the device’s three-dot menu and choose Remove device. Cancel any pending invitation or end its session first. Removal keeps the person’s account, roles, and history. A device still using Always On can register again when Screen2Screen opens.
Use the shared screen and touch toolbar
The live-session view places the Android screen beside Device details, with interaction controls above the video. A spinner and Connecting… message remain inside the device view until a video frame appears, and return while the stream reconnects. On desktop, drag the corner gripper in the narrow, even border to resize the screen without covering the device image.
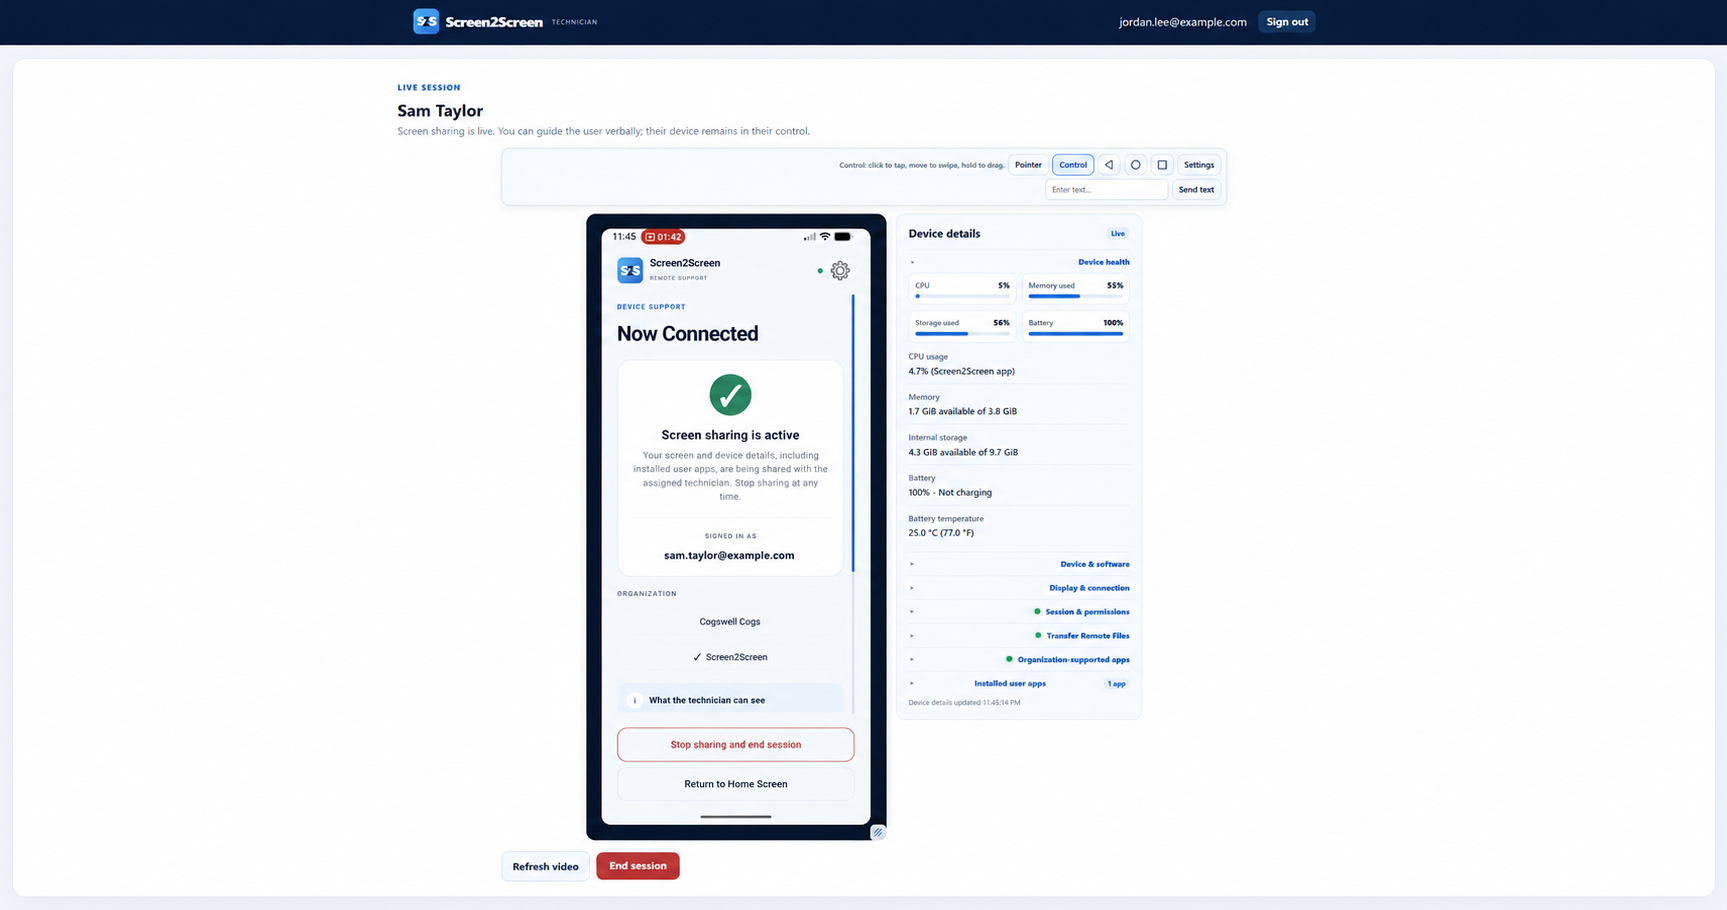
Open full-size screenshot ↗
Choose the interaction the user has enabled
- ✓View Only.
Watch the approved screen and explain the next steps while the user performs the actions.
- ✓View and Point.
Use Pointer to highlight a location on the user’s screen. The user enables Pointer control and grants Draw over other apps permission on Android.
- ✓View and Touch.
Use the touch tools when the user has enabled Touch control and the Screen2Screen Touch Control Accessibility service. Disabled controls indicate that the required device permission or session connection is unavailable.
| Control | How to use it |
|---|---|
| Pointer | Select a location in the shared screen to point it out to the Android user. |
| Control | Click and release to tap. Press and move immediately, then release, to swipe. Hold still for a long press; to drag an icon, wait for it to lift or its context actions to appear, then move and release. Control requires Android 8.0 or newer. |
| ◁ Back | The left-pointing triangle goes back on Android. |
| ○ Home | The circle returns to the Android home screen. |
| □ Menu | The square opens Android’s recent-apps view. |
| Settings | Open Android Settings on the device. |
| Send text | Focus an editable field on Android, enter the intended text in the toolbar, and choose Send text. This replaces the focused field’s contents. |
Explain the actions you are taking. Do not request passwords, authenticator codes, payment details, or other secrets. The Android user can disable interaction permissions or stop sharing at any time.
Expand only the details you need
Device details starts with Device health open. Select a section heading to expand or collapse it, keeping the panel focused while troubleshooting. The live-session screenshot above shows the health gauges and collapsed sections.
- ✓Device health.
Review CPU, memory, storage, battery, and battery temperature when reported. The CPU label identifies device-wide usage when available or Screen2Screen app usage as the fallback; do not assume both describe the whole phone. The gauges help you spot low storage, memory pressure, or a low battery.
- ✓Device & software.
Check manufacturer, model, Android version and security patch, Screen2Screen version, and language before giving device-specific instructions.
- ✓Display & connection.
See orientation, screen dimensions, connection type, Bluetooth status, Wi-Fi signal, and live video quality. Help buttons explain RTT, jitter, packet loss, and dBm. Expand Network identifiers & IP addresses when needed; some values may be unavailable because of Android restrictions.
- ✓Session & permissions.
Check screen sharing, technician pointer, Touch control, and Draw over other apps. The colored summary dot is a shortcut; expand the section to identify a missing permission. Request pointer permission asks the user to take the required action—it does not grant access for them.
- ✓Transfer Remote Files.
Browse only the user-authorized folder and its subfolders. The green summary dot means access is enabled and the device is connected; yellow means off, revoked, or not ready. Use the instructions below to request access or transfer files.
- ✓Organization-supported apps.
See whether your organization’s workflow apps are installed and which versions are reported. Open asks the user to open an installed app; Install prompts them to visit its store listing. These are user-reviewed requests, not silent installations. A yellow dot means device notification permission is missing, so requests outside the Screen2Screen app may not appear; green means notifications are enabled.
- ✓Installed user apps.
Expand the scrollable app list at the bottom to check names and versions. System and background-only apps are omitted. The inventory may arrive in stages during the session. Choose Uninstall for an eligible app to send a review request; Android asks the user to confirm removal. This is not a silent uninstall.
Browse and transfer remote files
- Expand Transfer Remote Files in Device Info and choose Open file browser.
- If access is not authorized, ask the user to review the request in Screen2Screen and choose a shared folder in Android. A notification can bring the user back when permitted. The request expires after five minutes or can be cancelled.
- Use Open for a subfolder, Up one folder within the chosen folder, and Previous/Next for more files. The list scrolls inside Device Info.
- Choose Upload file to create a new file in the current writable folder. Choose Download, then Save file, to save a file on your computer or phone. Transfers support one file at a time up to 20 MB. Existing names are not overwritten; rename the local upload if needed. Unknown-size downloads are unavailable.
- Use Cancel file request to stop a pending request or transfer. After a disconnect, reopen the browser and retry rather than assuming a transfer completed.
The user can authorize the folder in advance or revoke it in Android Settings → Remote file access. The choice is remembered per account on that device across organizations. It does not expose private app or system storage, and revocation does not recall an already saved file.
Send a Wi-Fi configuration
- In Display & connection, expand Add Wi-Fi network.
- Enter the SSID, WPA2 Personal or available WPA3 Personal security, password, and Hidden network flag if needed. This requires supported Android 11+ Wi-Fi hardware.
- Choose Send Wi-Fi configuration. The user reviews the request and chooses Review in Android, then approves saving in the system dialog.
- Read the reported save result. The network may already exist, be declined, expire, or fail. Saving can briefly interrupt the session and does not verify internet access.
Do not ask the user to disclose their saved Wi-Fi passwords. Enterprise/certificate networks and retrieving stored passwords are not included in this tool.
Live, Waiting, and Stale describe the reported details. They are separate from the video connection: receiving device information alone does not prove that the shared screen is updating.
Find a session in Support History
Open Support History to review your own recorded support sessions for the selected organization. Each entry identifies the Android user by name and email and includes the session time, Session ID, duration, and status. Choose 10, 25, or 50 events per page, then Previous or Next to browse the available history.
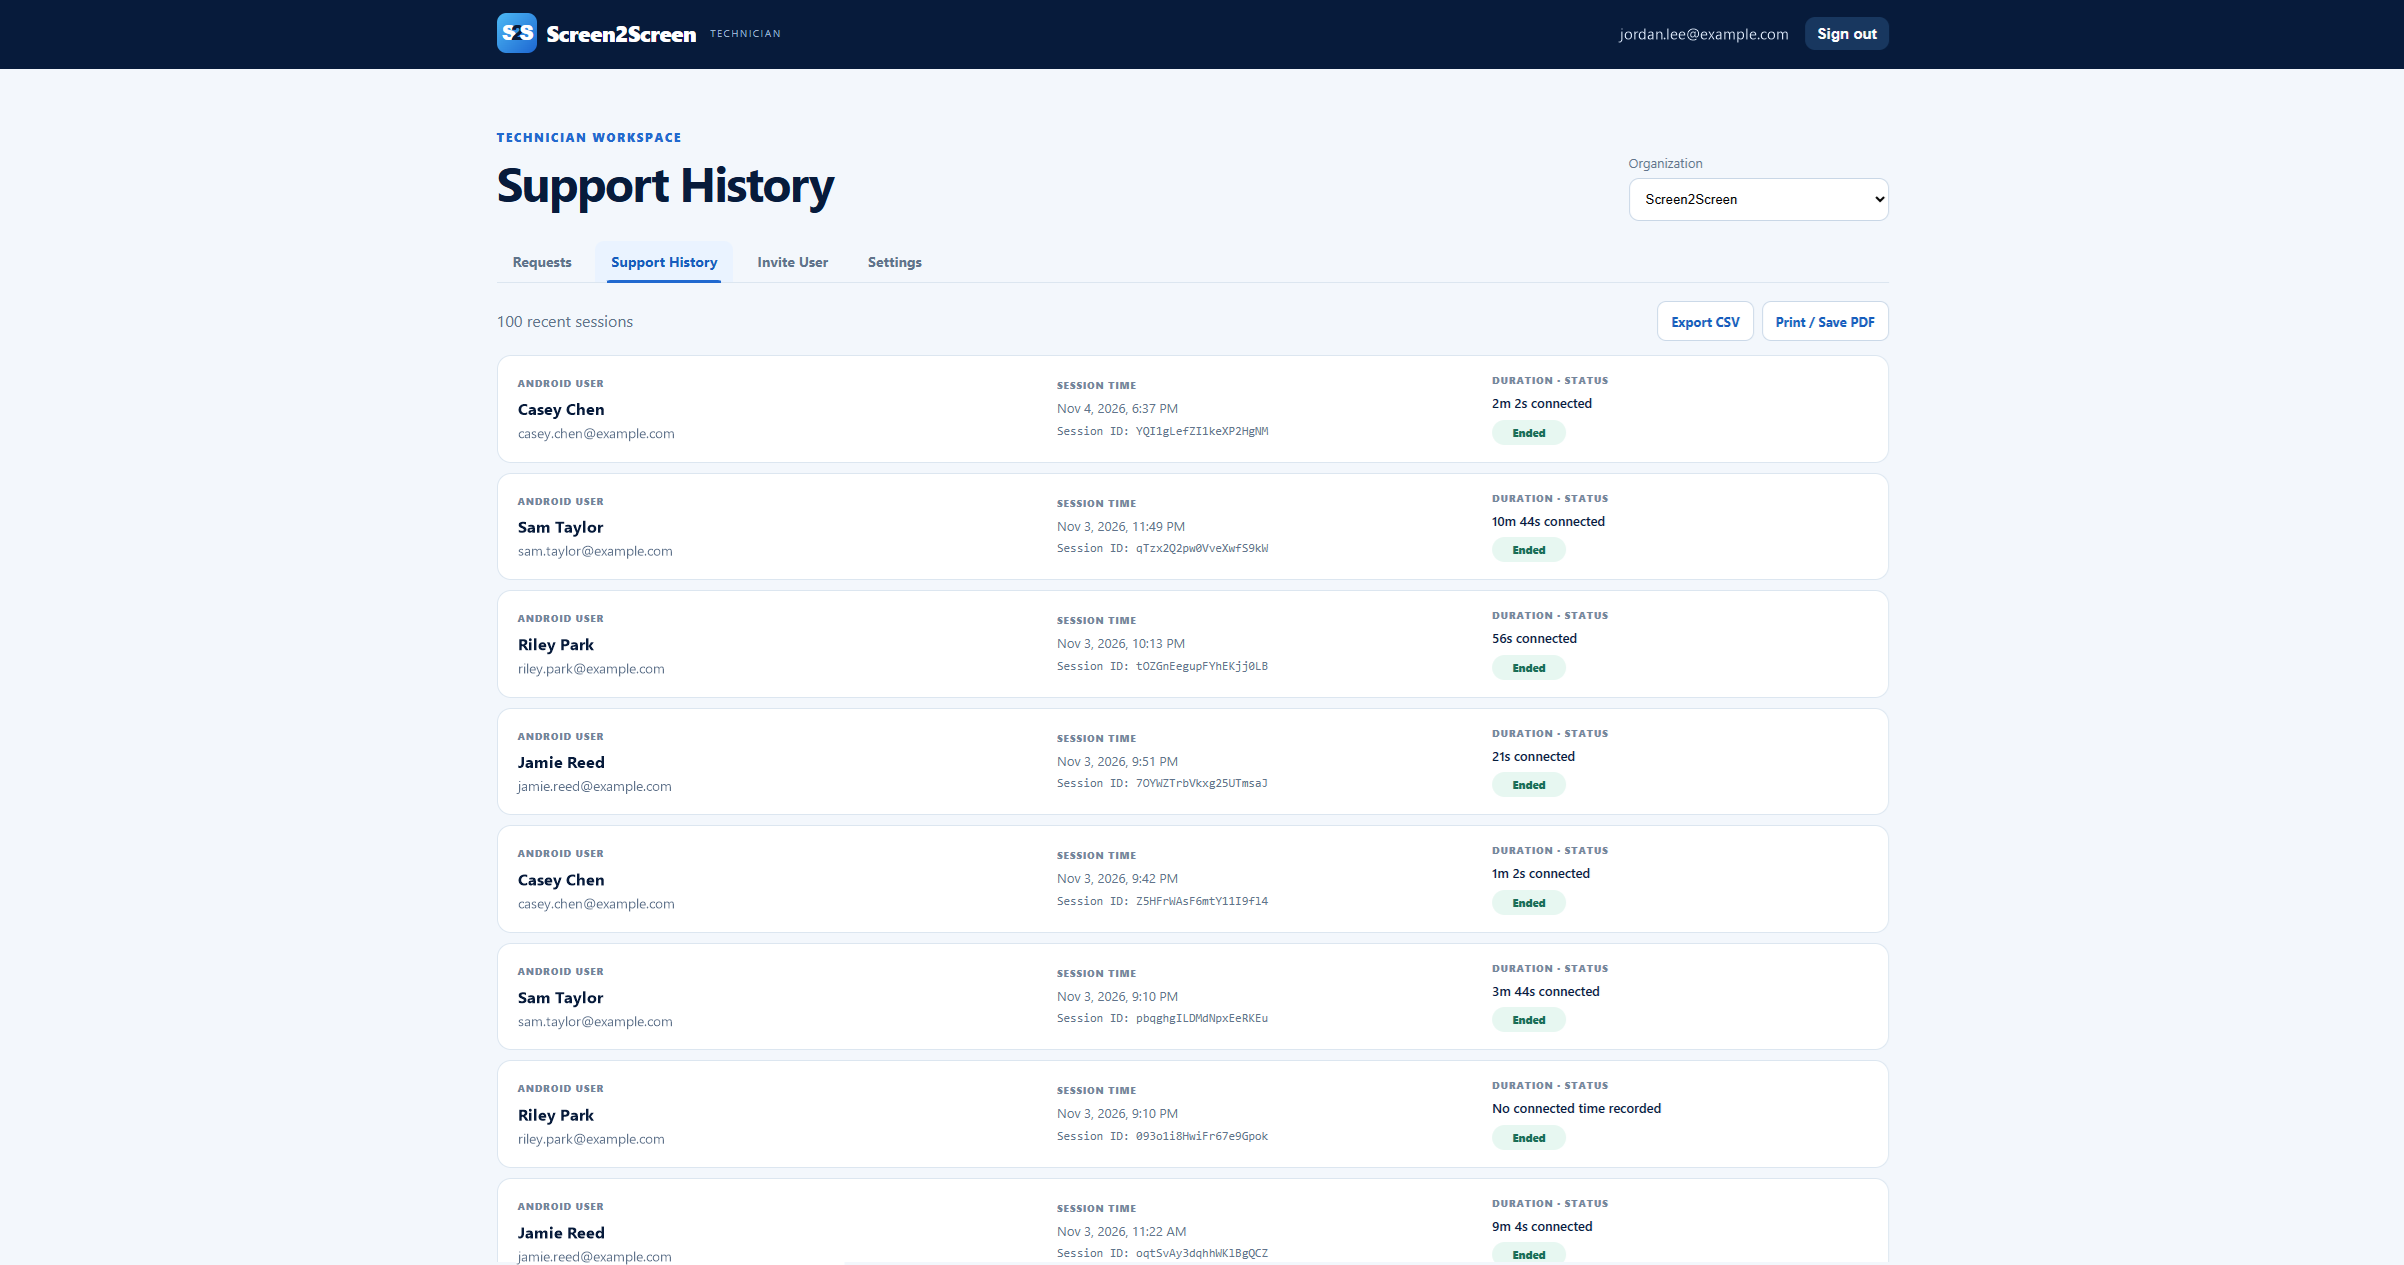
Open full-size screenshot ↗
Choose Export CSV for a spreadsheet-friendly copy of the loaded history, or Print / Save PDF to open the print view and select your browser’s PDF destination. These exports cover the loaded history, not an unlimited archive. Treat exported names, emails, and session information as organization records.
Organization admins can review activity across their team in the Admin Workspace’s Technician History tab.
Use Invite User when your organization allows it
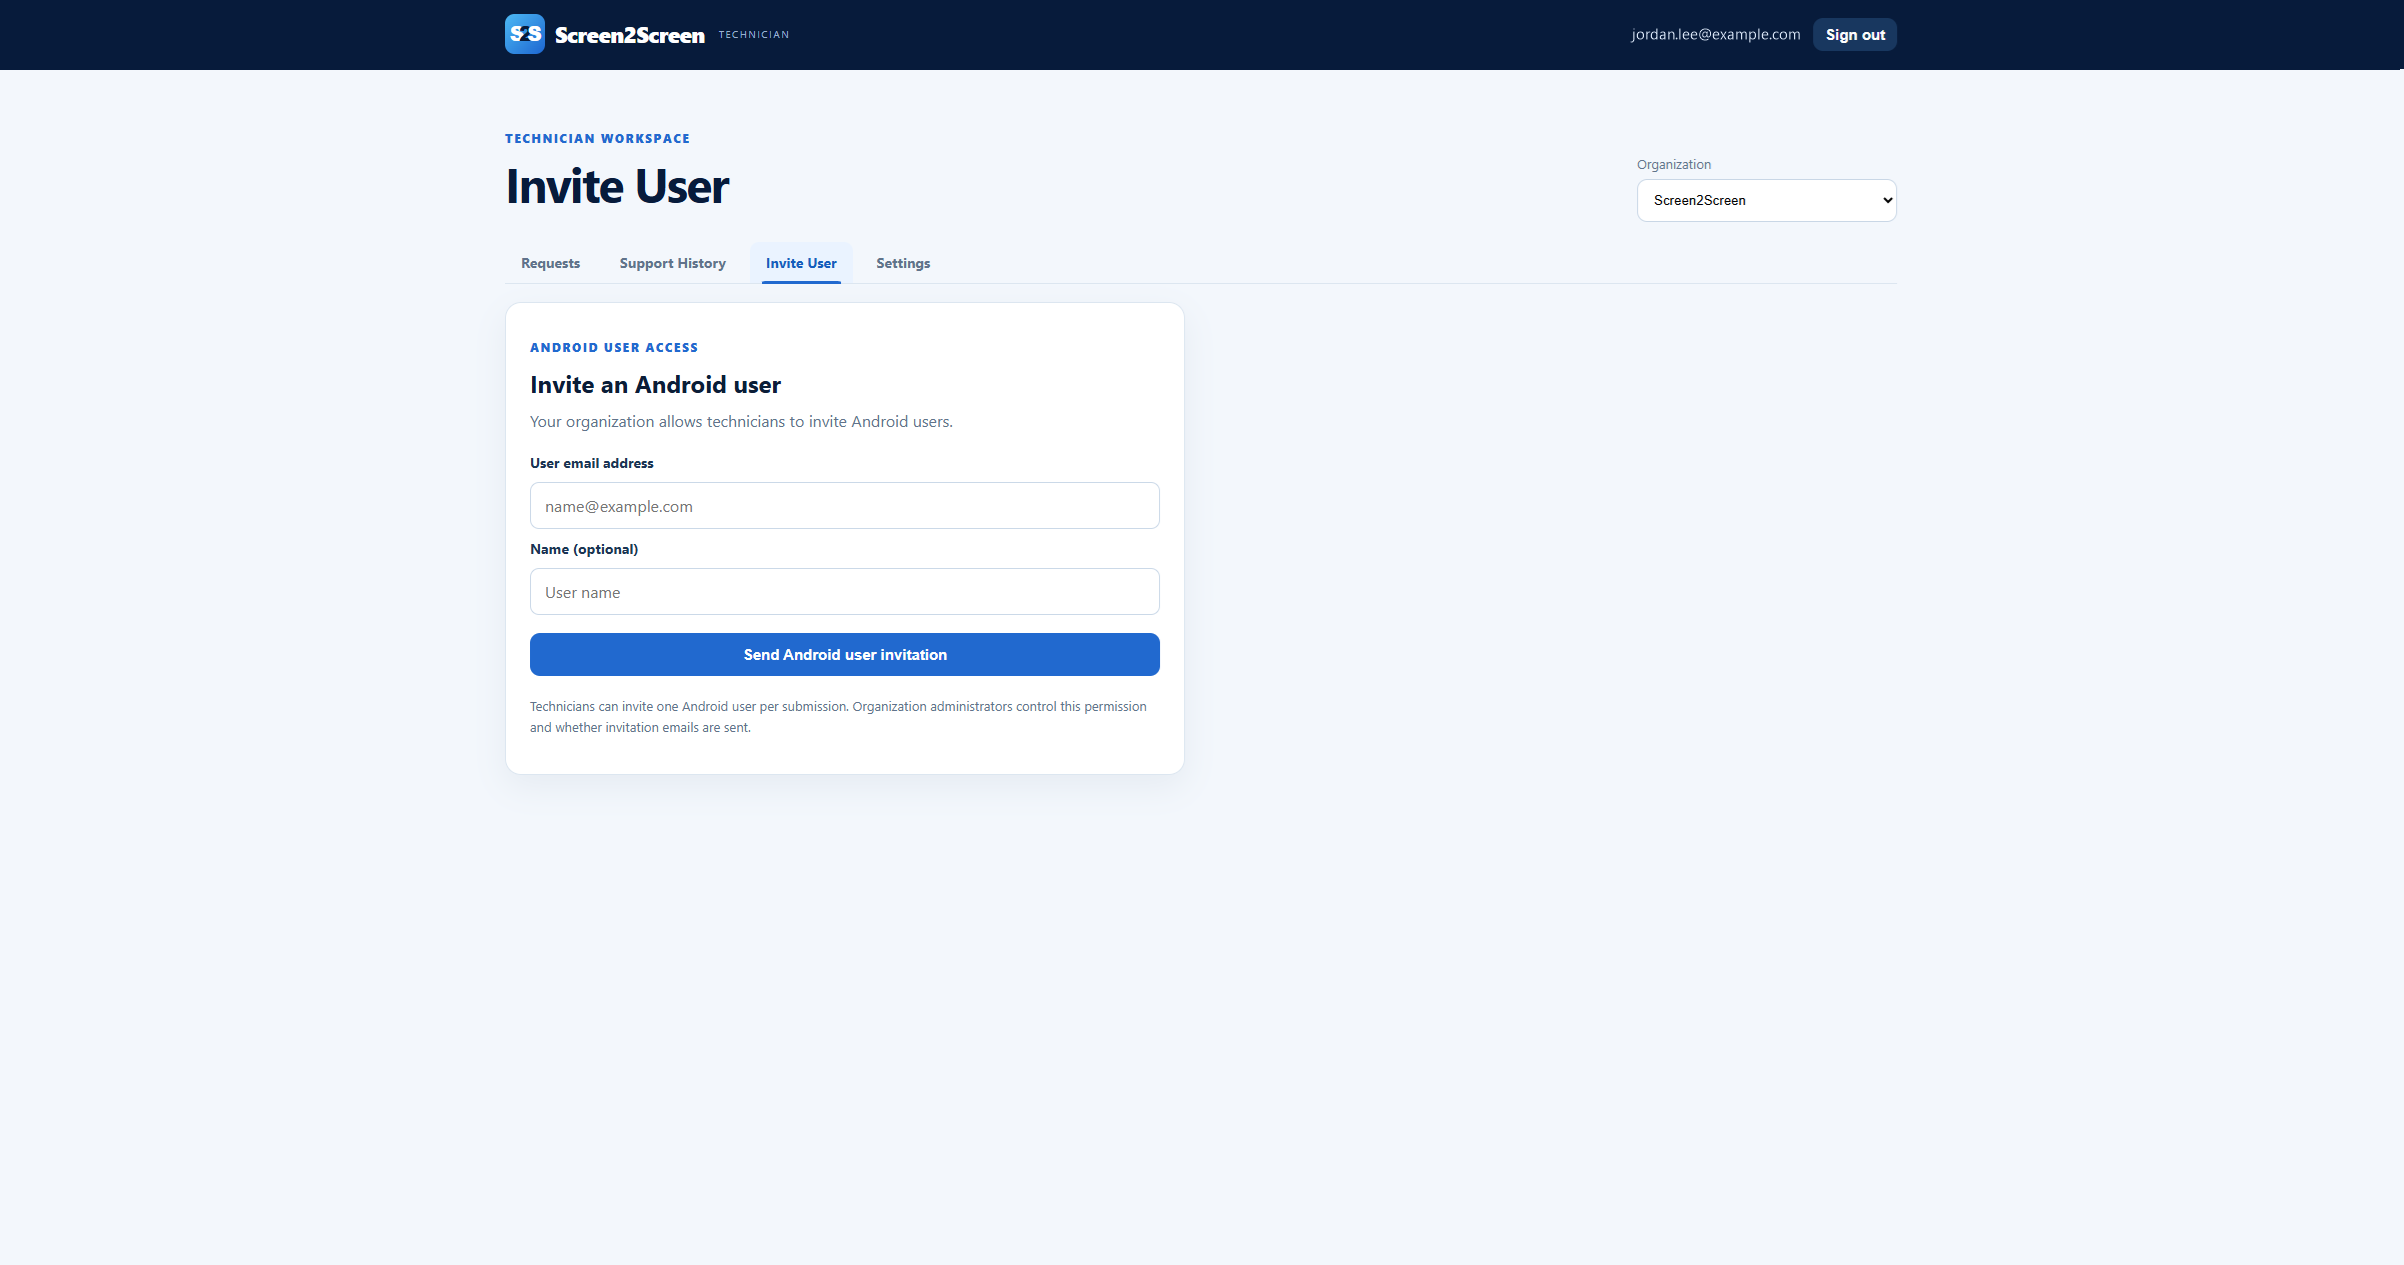
Open full-size screenshot ↗
- Open Invite User and confirm that technician invitations are allowed for the selected organization.
- Enter the Android user’s email address and, optionally, their name.
- Choose Send Android user invitation. The person signs in to the Android app with that invited address to join the organization.
Technicians can invite one Android user at a time. They cannot invite other technicians or admins. If the form is disabled, ask your organization admin about invitation permissions.
Manage your authenticator and queue alerts
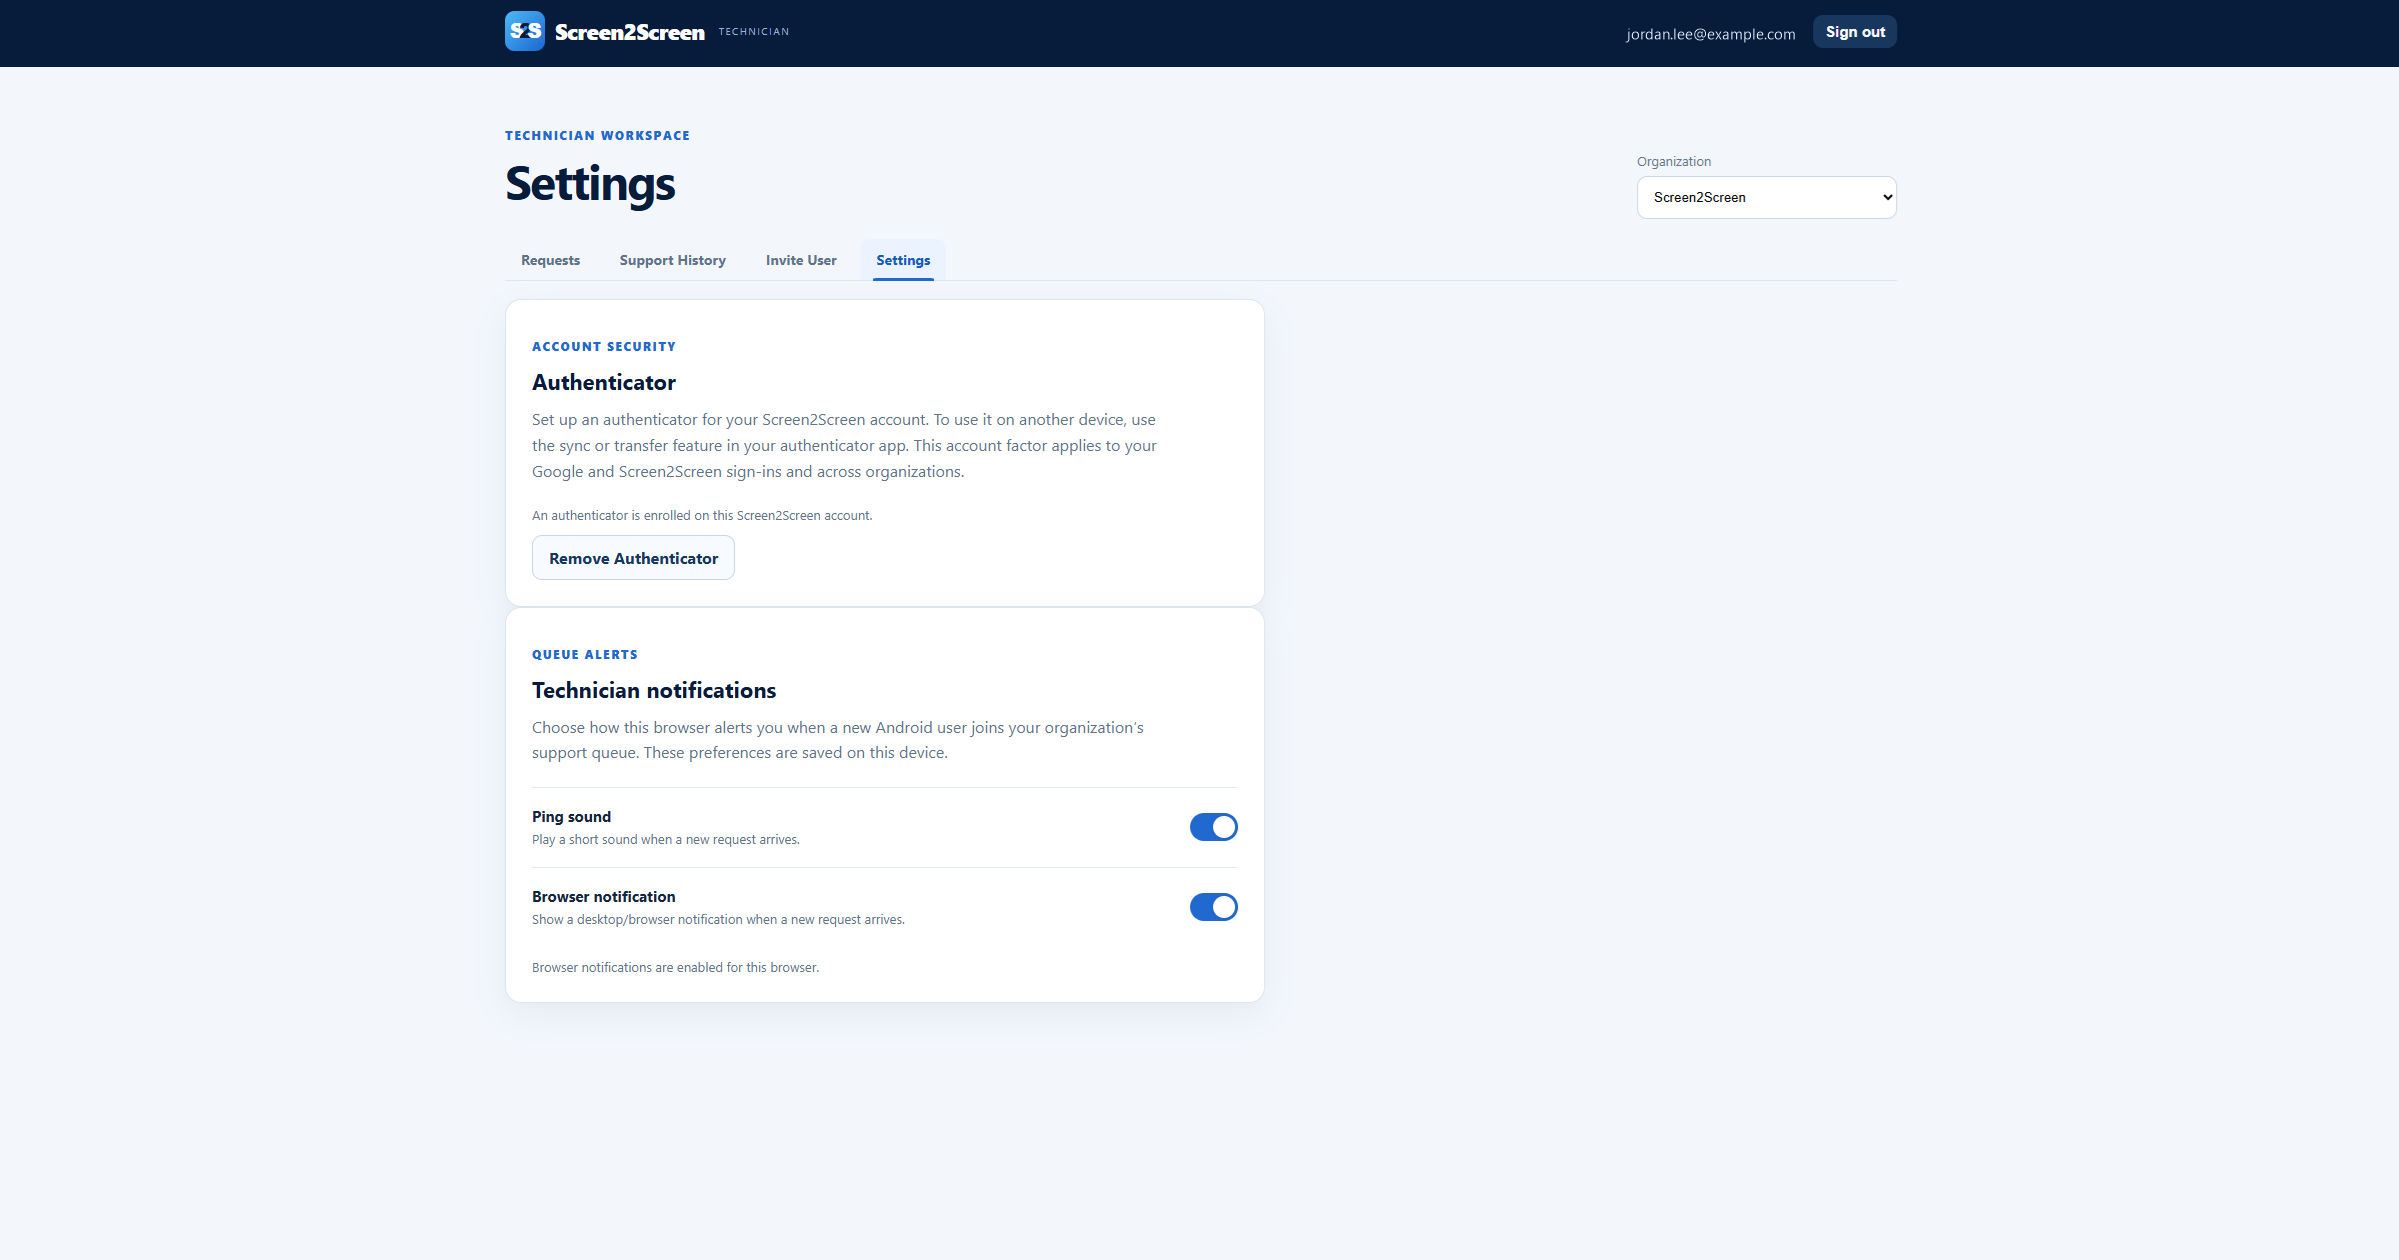
Open full-size screenshot ↗
Authenticator
You can set up an authenticator voluntarily before your organization requires one. Choose Set up authenticator, scan the QR code with your authenticator app or use the setup key, and verify the current six-digit code. On the same phone, use a supported authenticator setup link or copy the key into the authenticator app.
When an authenticator is enrolled, the page shows Remove Authenticator instead of offering another enrollment. Use your authenticator app’s sync or transfer feature for a new device, or remove the existing factor before enrolling a replacement. If you are locked out, contact your organization admin or Screen2Screen support.
Technician notifications
Turn Ping sound on for an audible new-request alert. Enable Browser notification and allow notifications when the browser asks. Preferences are saved on this device; another browser or device may need its own setup. Browser and operating-system notification settings can also suppress alerts.
Your organization controls the Tech Workspace’s inactivity timeout. Stay attentive during support: inactivity can sign you out and end an active session.
Report a problem from the Support tab
- Open Support and check the selected organization.
- In How can we help?, explain what happened, what you expected, and the steps that reproduce it. Include the Session ID, approximate time, and app/device versions when relevant.
- Choose Submit support request and wait for the confirmation. Keep the displayed reference for follow-up.
Your signed-in email, organization roles, organization name, and Organization ID are included automatically. Do not include passwords, authenticator setup keys or codes, or payment card details. Use your organization’s normal help channel for day-to-day user support; this form contacts Screen2Screen about the product.
End the session clearly
Choose End session when support is complete. The Android user can also stop sharing in Screen2Screen or with Android’s sharing controls. The Tech Workspace returns to the queue when the session ends.
Move or hand over the technician session
Open the Tech Workspace in a browser on the destination computer, tablet, or phone and explicitly join the session. That newer join takes over and disconnects the prior technician window. Another authorized technician in the organization can take over an active session after confirming the handoff. Signing in on a second device alone does not automatically join it. Use one technician viewer at a time; the Android sharing session remains subject to the user’s permission.
If the screen is missing or frozen
- Check whether the user has approved Android screen sharing and whether the session is still active.
- Check the live-session message and Device details. Waiting or Stale information can help distinguish a permission issue from a connection interruption.
- Allow the automatic reconnection to recover. For a frozen view, choose Refresh video to ask the device to refresh its capture stream; this does not end the session or bypass the user’s permission.
- If support still cannot continue, agree with the user to end the session and start a new request.